Another ISO creation application. Another way for users to compress data into virtual disks. Another way for users to generate a helpdesk call about how their ISO application isn’t working as it does normally because they meddled with the configuration settings of the applications.
That’s where PolicyPak comes in. We enforce and lock down the optimum settings and values that you, the administrator, want them to have. PolicyPak sets and enforces expectations for your users’ applications, so that they get the same experience, every time they launch it.
We do it for so many ISO file creation applications, including PowerISO. In fact we provide Paks for over 100 applications that you use today.
Keep your PowerISO configuration settings enforced and streamlined with PolicyPak. Check out this video to see how it’s done:
Our PolicyPak software snaps-in to the Group Policy Editor and gives you the same user interface as PowerISO itself. Let’s say you want to enable “Shell Integration” for your more advanced users. With PolicyPak, simply check “Enable Shell Integration” and then select the PolicyPak feature, “Disable corresponding control in target application” to totally disable the setting within the desktop interface.
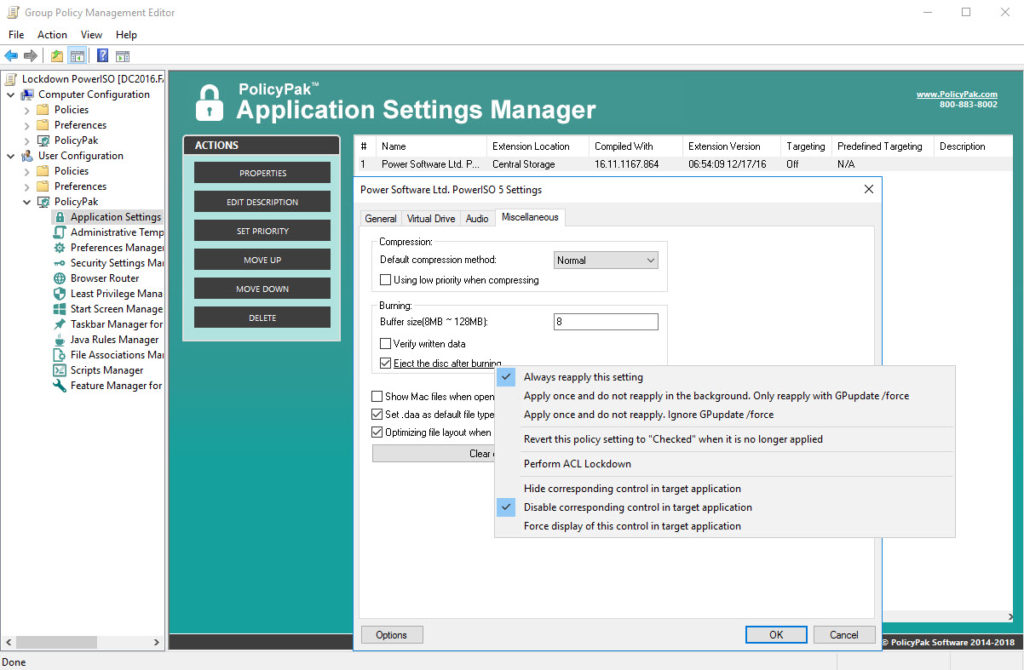
How do your users know when the disk burning process is complete? They expect the disk to be ejected of course, so make sure it always ejects every time. Use PolicyPak to check “Eject the disc after burning” and then disable it as well.
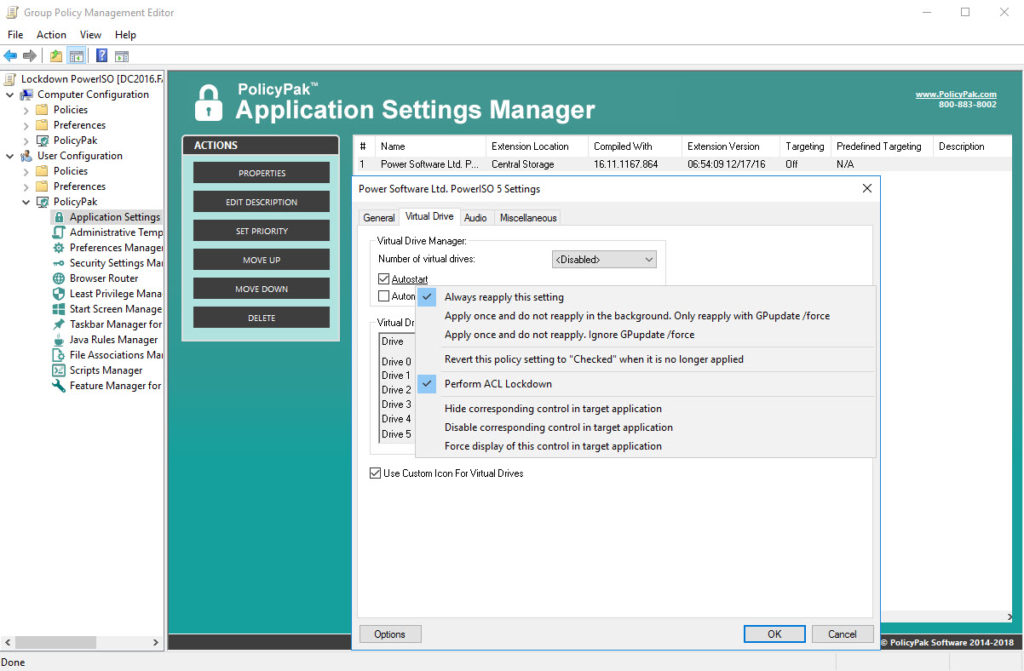
You don’t want your users making configuration settings related to virtual drives. Make sure that the “Autostart” setting value is always unchecked. Then select feature, “Enable ACL Lockdown. This exclusive PolicyPak feature prevents even the most savviest of users to change application settings through the registry itself.
With PolicyPak, you’re the one in control.
Besides, once you’re using PolicyPak to manage PowerISO, you’ll also get to manage all your other enterprise desktop applications the same way: Flash, Lync, Java, Firefox, and any custom applications you have. They’re 100% included – absolutely free.
It’s all included when you’re a PolicyPak Professional customer.
PolicyPak was designed by Microsoft MVP, Enterprise Mobility Jeremy Moskowitz – who “wrote the book” on Group Policy, runs GPanswers.com, and lives and breathes Group Policy and enterprise software deployments and desktop lockdown.
When you’re ready to get serious about managing PowerISO, PolicyPak is ready for you.
Lockdown Microsoft PowerISO Video Transcript
Hi, this is Jeremy Moskowitz, Microsoft MVP, Enterprise Mobility and Founder of PolicyPak Software. In this video, we’re going to learn how to configure PowerISO using PolicyPak.
I’ve already got PowerISO installed on my computer, and I’m just a regular user here. As you can see, I’m logged on as a guy called “eastsalesuser4.” I’ll open up PowerISO, go to Options – Configuration, and examine the application settings a user has access to.
Here in “General” I have some settings such that govern application updates and shell integration. On “Virtual Drive” I have settings for virtual drives such as “Auto Start” and “Auto Mount.“ Here in Miscellaneous I have an assortment of settings such as “Default compression method” and “Verify written data.”
PowerISO is a registry based application which means any standard user can modify these registry settings and get around your desired configuration values. I have the registry location saved here where I can go straight into the registry and modify the setting for “EjectAfterBurn” and change the value from 1 to 0. As you can see, EastSalesUser4 has the rights to do this. No Admin rights required.
Now let’s see how we can ensure compliance and perform desktop management of settings quickly using PolicyPak. I’ll go ahead and switch over to my Management Station computer.
We’ll go ahead and right click over our “East Sales Users”, “Create a GPO” and we’re going to call it “Lockdown PowerISO.” So this GPO is now associated with the “East Sales Users.” I’ll right click over it. I’ll click “Edit…” I’ll dive down under “User Configuration,” PolicyPak/Applications/New/Application.” There it is, “PolicyPak for PowerISO” along with other applications like “Java,” “Flash” “Firefox,” “Skype” and lots of other important desktop applications that your users utilize every day (and you want to make more secure).
Let’s start with “General” and let’s make sure that “Enable Shell Integration” is always checked. Notice how the setting value became underlined when I unchecked it. That means that the setting value will be delivered by PolicyPak.
Now let’s lock down this setting by disabling it which will prevent my users from accessing it and possibly altering it. I’ll simply right click on the setting and select “Disable corresponding control in target application.”
This button, “Check Now” which allows standard users to manually check for updates for this application is a tempting button for them I’m sure so let’s just hide it from them. Simply right click on the button and select “Hide corresponding control in target application” and it is.
Make sure your users know that the burn process is complete by ensuring that the disk is ejected. Here I will check “Eject the disc after burning” and then I will use PolicyPak’s unique ACL Lockdown feature to lock this setting all the way down to the registry itself. Just right click on this or any setting and select “Perform ACL Lockdown” and the registry lockdown process is complete.
Now I will go back to my client machine, we’ll get a command prompt and run “gpupdate.” Now you could envision the user logging on for the very first time, using a Terminal Services or Citrix machine, using a VDI session, changing job roles, or getting a new computer. I just happen to be using gpupdate. Yes, PolicyPak performs the magic. To get the magic delivered, you can use Group Policy, SCCM, LanDesk, KACE or your own systems management software. Even if the user is offline, your settings are always preserved because PolicyPak is always working for you in the background, making the job of you the administrator, easier.
Now let’s open up PowerISO again and check our settings. Notice that “Enable Shell Integration is not only checked, but it is completely disabled and that the button we were used to seeing in the lower right hand corner just isn’t there anymore which means that users can’t click on it for sure. Then we’ll verify that my desired check for “Eject the disc after burning” has been delivered on the Miscellaneous tab.
Now let’s pretend this user tries to change the settings in the registry again. I’ll open up the registry location once again and to attempt to modify “EjectAfterBurn” and as you can see the efforts of this user has been thwarted. PolicyPak with ACL Lockdown has locked down these registry settings.
And we are done. That is how incredibly easy it is for you to use PolicyPak to manage PowerISO as well as tons of other desktop applications.
If you’re looking for a trial of PolicyPak, just click on the “Webinar / Download” button on the right.
Thanks so much for watching, and get in touch with us if you’re looking to get started. Talk to you soon.


